
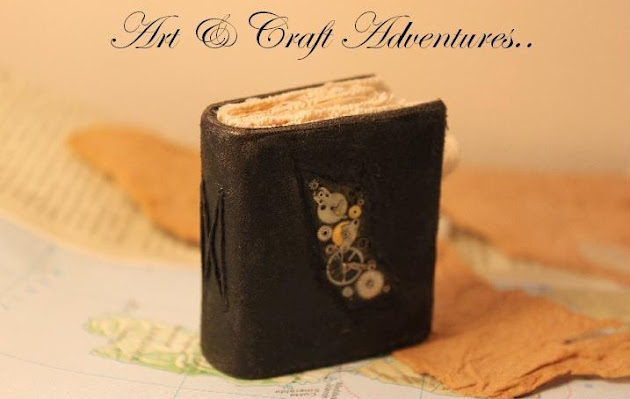
This is a tutorial on how to make the above altered matchbox book cover, and mini book.
You will need -
For the cover -
An empty matchbox
Catering foil
Scissors
PVA glue
Paintbrush
Acrylic paints
For the Mini book -
The pull out draw in the matchbox/and an extra small piece of card
Thin leather/or fabric (For the cover)
A piece of Hessian/or other material (For the inside of the cover)
Papers (For the pages)
Black cotton thread
PVA glue
Needle
Awl (or something sharp and pointy)
Pencil/ruler
How to make the matchbox book cover
Start by opening up the inside draw of the matchbox. Using the sides, cut 4 strips of card to form your frame on the front of the matchbox. Put aside all that is left, for your mini book. Glue into place with PVA glue. Don't worry if your frame isn't perfectly straight or the widths differ slightly- This will all add to the aged effect.
Once dry, take a foil piece, approx 4 times the size of your matchbox. Crumple up the foil in your hand, and then unravel again. Cover the entire matchbox in a thin layer of PVA glue, and stick on your foil. Fold over the edges on the ends, and glue inside of the box.
Take your paintbrush and gently rub over the box, flattening the foil. Your raised frame should now be visible.
Paint the whole box black. If you find your paint will not adhere to the foil very well, then mix your paint with some PVA before applying.
Let it dry completely.
Now to find the treasure! I mean texture ;) This has to be the best part, in my opinion.
Mix some white paint with another 'warm' colour. Using a dry paintbrush, put a very small amount of paint onto the brush. Very lightly rub the brush all over the box, and all the wonderful textures should slowly begin to reveal themselves.
You can add extra highlights if you wish, using the same technique but with purely white paint.
Once dry, coat in a layer of PVA to seal everything.
You can use the frame to display charms/photos/fabric ect (Examples at the end of this post)
How to make the mini book (which fits snugly into the matchbox cover)
To prepare the book cover, Take the bottom of the pull out draw and cut/shave off 2mm all the way around. Use this as a template to cut another piece of card, exactly the same size. You will then need to cut a piece of card for the spine of the book. This should be as long as the covers, and the width around 2mm smaller than that of your matchbox.
(Excuse the mess on my cardboard - I am a messy crafter ;)
Next, glue the three pieces as shown, onto your leather/Material you are using for the cover. You will want to leave a small gap in between each section, as shown.
Trim 1cm around the glued card, and cut off the corners.
Glue each tab down with PVA, and try to match up each of the corners (Cutting away any excess)
Once firmly stuck down, apply a thin layer of glue to the inside of the cover, and pat down your material. Trim away any excess and fray edges if you choose.
Preparing the pages-
Cut the papers to the necessary size. They will want to be slightly smaller than your cover, when folded. Use a bone folder/or a ruler to smooth down the fold. Use your made cover as a guide. The pages should fit nicely into the book, and not be too crowded or sparse.In my example book, I used some thick grey card and some teared mulberry paper. As these are fairly thick papers, I only needed 3 pieces within each signature.
The number of pages you have will depend on what type of paper or card you use.
Separate into 2 equal piles. Each pile will become a signature within the book.
Open up each signature, and hold together with paper clips/mini bull dog clips.
Using a pencil, mark the centre of the fold. Then mark 1 cm above and below this point. For the spine, draw a line to mark the middle horizontally, and then vertically
Along the middle line mark 2 points equally spaced apart from the edges, as shown in the diagram. Mark 2 points 1cm above and below these 2 points.
Using an awl (Or a sharp pointed object) carefully make holes in both the points marked in your signatures, and the points marked on the spine. Make sure your holes go right the way through your pages, and also through all of the spine.
Sewing the signatures into the spine -
This is very easy to to. Think along the lines of a 'figure of 8'.
If you are using a standard cotton thread, make sure to double it up, adding more strength.
Sew each signature separately. Take the first signature, and align roughly the holes you have made, with those on the spine. Start from within the signature, on the middle point. Go through all of your pages, and out through the spine. Leave at lease 4 inches of thread within the book. Then go back through the top hole, and through your pages. You will now be inside the signature again. Go back through the middle hole and out through the spine. Then come back inside through the bottom hole, making sure you go through all of the pages again (This is when the paper clips/bull dog clips will come in very handy) Once inside, pull your thread tightly being careful not to snap it. When your signature is firmly pulled against the spine, tie off tightly together with the thread you left inside the book, when you began. Cut of any excess thread.
Repeat this on the other signature.
Remove the clips holding your pages together, and voilà your mini book is complete! :)
Here are some examples I have made, of how you can decorate your altered matchbox/and mini book.
If you find this tutorial helpful, or make an altered matchbox/mini book using my instructions, I would love to hear about it! Even better, I would love to see a picture of you finished piece. :)
If you have any questions, please ask.
Comments on my first ever tutorial are also very welcome!
Izzy, x


